Kurs realizatorów fandubbingowych 2016

Kurs pokrywa wstęp do miksowania i masteringu projektów wokalnych w kontekście piosenek fandubbingowych. Kurs przeznaczony jest głównie dla realizatorów dźwięku, dźwiękowców i reżyserów piosenek. Osoby aspirujące do wdrożenia się w świat post-produkcji znajdą dobry wstęp do podstawowych technik miksowania i pracy z piosenkami fandubbingowymi. Doświadczeni realizatorzy dźwięku też mogą znaleźć coś co ich zainteresuje. Oczywiście zachęcam do przejrzenia kursu wszystkich zainteresowanych śpiewaniem, nagrywaniem i post-produkcją nagrań wokalnych.

Prezentacje rozdzielone są na 5 głównych części.

Co robić przed rozpoczęciem miksowania?

Miksowanie

Mastering

I dodatkowe materiały budujące na wcześniej zaprezentowanych pojęciach i technikach procesu post-produkcji.

Post-produkcja – miks

Post-produkcja – master

Tutaj zamieszczam slajdy ze wszystkich części kursu.


Have you ever wanted your computer to understand you?

Well, I exaggerated the title a little bit. I did teach a computer something though. I taught it to distinguish between ‘warm’ and ‘bright’ equalised guitar recordings. Yay, so exciting!

Have you ever talked about a song with your friend and said that the drums in it were really punchy or that the vocals were warm and crispy? People use these descriptors intuitively however, how could we teach a computer to understand them too? For my BSc dissertation I successfully trained kNN and SVM machine learning algorithms to tell apart between the warm and bright equalised guitar recordings using Mel Frequency Cepstral Coefficients (MFCC).

You can read about it here:

Aligning Vocals… Drudgery or a walk in the park?

This time I want to show you a vocal aligning plugin I’ve recently found and started using like a madman. Knowing that I often work with tracks that I need to have aligned pretty tight, this discovery was just what I needed. When I think of all the long ‘late’ hours spent on aligning vocals in software such as Melodyne I get these uncomfortable chills on my back, ughh. Oh man, why didn’t I know about VocAlign before?! Well there is a good reason for it. I just wasn’t looking for it! To be honest I would be probably still working with software like Melodyne till this day if my friend hadn’t told me about it, but about that in a second. So, I wanted to think that the software just wasn’t around until recently but here came a surprise for me. Apparently the VocAlign project was first released in 2001 and now grew to see its new version which is available here.

One day I talked with my friend about timing vocals to one of the songs I was working on and (of course) I’d go on, and on about how annoying working with Melodyne can be. It can very easily destroy the signal making it sound like, hmm, well like Melodyne. Well, from time to time the vocals I work on need to sound alien-like, but hey welcome to the 21st century! Sometimes alien-like vocals may be the thing that the song calls for, right? With many popular songs nowadays you simply cannot tell if the vocals were actually sang by an actual human being.

But back to the story. My friend answered to my complaining with a question ’why don’t you just use VocAlign for your tracks?’. I wasn’t completely aware at the time of how that conversation will change the way I handle vocal aligning. but now, I know, and I am really excited to share some of my results.

So what’s VocAlign? It is an audio plugin that will automatically align two audio signals so that the timing of one matches the other. It works at 16 and 24 bit resolutions and sampling frequencies from 44.1 to 192kHz. But what truly maters is the simplicity and speed of the software. The work that was taking me an hour using Melodyne for example, decreased now to only few minutes. Don’t get me wrong, I still think Melodyne is a great piece of software and I still use it often, but so far VocAlign has made vocal aligning to me be just like a walk in the park.

Aligning with VocAlign: Examples

I will present 3 different examples that will consist of: 1) an .mp3 containing just a raw vocal tracks, 2) .mp3 containing vocal VocAligned tracks and 3) the mixed track.

Example 1 No Effects

Example 1 VocAlign

Example 1 Mix

The differences between not aligned and aligned tracks may be subtle in this example but I wanted to show it anyways because many things mastering engineers do, Are subtle. I learned that from Dave Pensado and his amazing series on YT called Pensado’s Place. Defnitely worth checking out if you are into music production, sound engineering, mastering, or anything else that has something to do with studio work.

So in this example we will see how VocAlign deals with a bit more recognisable timing variations.

Example 2 No Effects

Example 2 VocAlign

Example 2 Mix

In this example you can hear the differences much better (if you still can’t hear it then listen out for the word ‘hearts’)

Now I will just quickly write down the process I have to go through to align one track to the other: 1) Open VocAlign, 2) side chain the track I’m working on to the track that I want to align it to, 3) click ‘Capture Audio’, 4) playback the part that I want to align, 5) press ‘Analyse’>’Align’>’Edit’ and voilà, I have my aligned track.

Excluding the playback time the whole process takes me a few seconds. How amazing is that?! Definitely much better than moving each syllable manually.

But of course nothing is perfect (That’s a good thing. SMILEY)

Where does a subtle (=’good’) aligning end and where does a hardcore (=’not so good’) aligning start?

Example 3 No Effects

Example 3 VocAlign

What was wrong? You can probably tell yourself already.

Well, VocAlign uses sophisticated pattern matching algorithms that compare digital data. VocAlign moves AND stretches our recording so that it creates as closest match as possible to the side chained track. The obvious problem that arrises is this ‘unnaturally-stretchy-signal’ (probably the best way to describe it 🙂

Do we want it? Maybe yes, maybe not. In the end, I worked my way to have it sound like this: Example 3 Mix

Furthermore, in example 3 you should also notice the word timing differences. These may cause more problems if one is not careful.

The Bottom Line

  • I no longer have to waste my time aligning each syllable of my layered vocals.
  • Working with backing vocals has never been easier.
  • Yes, VocAlign sometimes does this weird stretchy thing to the signal, but so what?  I’m ready to forgive these little flaws if the process of aligning, as a whole, has been reduced to just a few mouse clicks.

This is the band that I used for the above examples, Make Sure You Check Their YT Channel: JetfaceGroup – YouTube

Maciek

Listening Tests

So in the previous article we managed to rip and compress our really good quality Mp3s. So now its right time to ask questions… Just how good are these Mp3s if compared to the sound on a CD? Have we set up the encoder correctly? The most obvious way to find out is to conduct a listening test, but…

But there is a problem.

It turns out that it is quite challenging to compare two audio sources of different quality, timing, and volume. The traditional method of audio listening tests is to play one song followed by another and ask which one sounded better. Interestingly enough, our brains recognize a slight increase in volume as an increase in clarity, which is critical in this situation, as we want to avoid possibility of confirmation bias. We need a way of switching between two audio sources of different quality at any point in a song, with no delays or changes in timing and volume.

I’ve observed many fierce debates in real live and online, where people insisted that they can hear the difference between 320kbps Mp3s and ones of even slightly lower bit rate. Some say that Mp3s are no good enough for serious audio equipment. Let’s hear if this is true.

I ripped one song from the same CD as an uncompressed wave file, as a 320 bit rate Mp3 and as the blend of VBR.

1

I imported the raw wave file and the 320kbps Mp3 into Audacity, one after the other.

2

Since, the Mp3 compression process had padded the start and finish of the file, it is necessary to remove the silence so that both tracks are aligned.

3

It’s quite slow and notorious to align both tracks as audacity does not support a user-friendly zoom in/out option. However, once you managed to zoom in so that you can see all the individual samples, I suggest to pick one that is standing out, and use it as a guide-sample.

4

Now the interesting part kicks in. I selected the whole region of the 320kbps Mp3 and inverted it. It means that whenever the waveform had previously gone up it now is going down, and vice versa.

5

Then I selected the uncompressed wave file with the inverted Mp3, and clicked mix and render.

6

This action created a mix file that represents the differences between our uncompressed and compressed files. I think it’s really interesting to see this pretty digital representation of the data chunk that we loose completely when compressing our CD files. You can hear how this sounds like here. Cool, right? Does it make a difference?

7

Then I imported a 320kbps Mp3 into Audacity. In the screenshot above you can see very clearly (on the same zoom-in setting on both tracks) differences in the sizes of both files. After this, I did the sample alignment again, and hit the play button. Both tracks plated simultaneously and sounded like the source CD. Mathematically, it was the source CD. The difference file and the compressed file equaled the source file. By muting the difference file at any point in the song, I could hear without distortion, or changes in volume, what is the difference in quality after compressing a wave file into a 320kbps Mp3.

I listened, and listened, but there was no difference to be heard. Don’t believe me? See if you can spot the points where the quality changes.

Listen here.

Did you hear any difference? No? Yes? Maybe? Try it again and listen for an increase in quality at 5 seconds which disappears at 16. Using modern Mp3 encoding methods, a 320 bit rate Mp3 sounds very much like the original (at least to my ears).

8

I repeated the same test using a VBR Mp3 instead of the normal 320kbps. As you can see the difference file is smaller from the normal 320 bitrate Mp3. You can listen to it and see if there is any detectable change in playback quality.

Listen here.

The quality should increase slightly after 5 seconds, then drop off at 16. I cannot hear any difference here as well. So does it mean that the 320kbps MPS sounds as good as an uncompressed CD .wav format?

In order to do a more obvious comparison I did the same test using a 56 bit rate Mp3 and the results were, as expected, humongous. The difference track was huge. You could really see how much audio was lost in compression. The 56 bit rate audio sounded horrible, but as soon as I unmuted the difference track it was suddenly sounding like the CD once again. You can hear it for yourself here.

Listen here.

In the end, I have to say that it is (almost) impossible to tell the difference between a song as an uncompressed wave file and a song that has been compressed as 320 VBR. I used DT 770s and my M-audio interface for these tests, and of course all results were confirmed using my teenage ears. Furthermore, the 320 VBR file I used wighted 8.2 MB, the normal CBR Mp3 weighted 10.3 MB, and the uncompressed wave weighted 45.4 MB. This shows that the VBR method provides great results while taking 25.6% less space than a normal CBR method in this example.

I think many people are not 100% honest with themselves when they say that all Mp3s sound worse than CDs. This goes especially for people with worn out ears who speak such heresies. On the contrary, I’ve read a few interesting posts where audiophiles argued that the average person doesn’t have the knowledge or experience to verbalize the fact that what they hear is an MP3. I don’t think that is the case in the kind of tests I conducted, as I tried it on few other recordings, and all the findings were the same. However, it may vary in more surgical audio situations where a trained ear, that knows exactly what to look for in the high frequencies, will be able to distinguish between a wave file and Mp3. Often, it will be the ‘air’ of high frequencies that may provide some small differences between a good quality MP3 and a .wav file.

Speaking of recording, mixing and mastering though… I would never include good quality Mp3 files in my mixes because I believe there are certain situations that ask for certain tools. I’d try to keep my recordings the highest quality possible, but that also may change depending on a final, envisioned version of a song I’ll mix.

Again, Mp3 algorithms improved drastically over the past decade. We do not suffer anymore from tons of audio errors if an Mp3 is ‘only’ 192kbps. In fact, I’m positive that dropping to 128kbps would still be acceptable for many people. Especially if played on poor playback platforms such as iPods, iPods or similar, where listening conditions aren’t great anyways. I think we should admit however, that correctly compressed, high quality Mp3s are good enough to satisfy the needs of serious music listeners. Listeners who strive for a really good quality sounds that can be expressed through some serious equipment.

I’m also attaching this little section here, as I find it really fascinating how the same file compression comparison test can be shown visually.

So here is an alternative way of looking at compression subject.

Lossy Audio Codec’s Comparison

Another interesting visual example.

How to check quality of Mp3 file

And last, but definitely not least… for those who are interested in Recordingreview.com, I’m posting this link to a really interesting debate on this subject.

The endless mp3 vs wav debate: Randomized Blind Listening Test

I’d like to thank BugbrainNobax, Walter, and Jax for inspiring me to conduct this experiment.

Maciek

Audio Ripping and Compression

Recently I’ve been really interested in the whole talk about audio quality. I really value ‘good’ quality recordings and cherish the moments when I have access to these, but I was never too obsessed about it. Everyone will have their own interpretation of what sounds good anyways. Ha! And that is what’s really interesting.

While I do not lament when I sometimes listen to 128kbps Mp3 files, I believe it is important to be able to compress audio files correctly because the poorly processed ones can ruin our ears forever… Or, for example, negate the advantages of an expensive speaker set that we may use.

So I will present a method of audio ripping that will allow anyone to be left with a really good quality compressed files, as well as a little experiment, which hopefully will once and for all, save me from wasting my time thinking about differences in quality between an uncompressed audio file and a ‘correctly’ compressed Mp3 file.

The first step is to find a CD that you would like to burn and then check it for any possible scratches. CDs are made from polycarbonate plastic (Macrolon) which is a sturdy and strong material that sadly scratches quite easily. The designers saw that coming and planned for it. The Red Book Standards for Audio Compact Discs enforces an error correction system that allows CD players to deduce a surprising amount of data based on the data which comes before and after a scratch.

Furthermore, the data is not stored on the shiny part of the CD, but is actually stored on the label side (the program area). The CD player’s laser has to make its way through a layer of plastic till it reaches the disc’s data. So after all, a small scratch on the back surface of a CD is not as dangerous as it may seem.

OK, so if you got that far and think that few facts about the program area of a CD will spoil this reading then just skip to the next paragraph… The program area of a CD also conforms to Red Book standards. Data is stored internally in a series of “bumps” known as “pits”. These pits are located in a single spiral track of TDM (time-division multiplexing) data. The data pits come in 8 different lengths: from 0.833μm to 3.56μm. The varying length and distance between the pits is how the digital audio information is stored in NRZI (the NRZI stands for non-return to zero inverted and is one of the most popular languages used for Pulse Code Modulation (PCM)).

So, once you’ve chosen a CD that you are satisfied with, you will need a piece of software that will allow you to rip and compress it. I’m using Switch, which works both on pc and mac. Once you have opened any reasonable audio file converter software then I would take a moment, and poke around the encoding tab. Mine looks like this.

p_ripping1

These are the settings I’d use for creating high quality Mp3s. I’ll write a little bit about the details after.

Encoder itself is one of the applications to encode audio to Mp3 files so they take far less storage space. This is called lossy compression. On that note, many people think compression equals a reduction in data and quality let say Mp3, MPEG, DTS and JPEG. Well, this is not always the case. Few examples of lossless compression: ZIP, RAR, TIFF, MLP. But back to the encoder. The encoder uses two different compression methods namely, CBR or VBR (see above settings).

CBR stands for constant bit rate, which basically means that you tell the encoder to express every second of audio with a certain number of bits, and it does just that. It will give every single second of audio the same amount of space. There is nothing really bad about this method, it is simply very wasteful and produces bigger file sizes than VBR. Hence, somebody smart came up with another method called VBR.

VBR stands for variable bit rate and is the most commonly used encoding type. With VBR the encoder considers every section of audio very carefully and decides how many bits it would take to encode it with the desired level of quality. This means that the bit rate can actually drop to almost nothing in the parts where there is silence, shoot up to high hundreds when the song starts, and peak at the limits of the encoder during particularly delicate passages.

Mode in the stereo encoding section, I would leave on joint stereo as it offers better quality. In the joint stereo the encoder can spend the available bits more efficiently than normal stereo mode. There is a technique involved known as joint frequency encoding, which functions on principle of sound localization. It stores one channel as the difference from the other as opposed to an entire second audio stream.

Quality is the deceiving one. It basically tells the encoder how many shortcuts can it take during the analysis and compression process. When (q=0) the encoder does everything super accurately. When you set it to 9 it will do everything in a more ‘clumsy’ manner. The technology has moved by quite a lot since 1993, so nobody would really use low quality encoding today.

CRC stands for a cyclic redundancy check and is an error-detecting code commonly used in digital networks and storage devices. I don’t know what real advantage it will bring to this compression process so leaving it alone, and unchecked should be completely acceptable.

If I’m using a VBR then I want the encoder to have access to the widest range of bit rates possible. The minimum should be at 32 and the maximum should be at 320.

The output sample rate is not shown in this window but I know it is going to be the original CD sample rate, which again thanks to the Red Book Standards, is said to be 44,100kHz.

OK, lets get down to business.

2

Above you can see all my loaded tracks in .aiff file format. All that’s left to do is to click convert and all the Magic will be done for us.

3

The conversion of all the files will take a while. After the conversion finishes, you are done. You’ve just converted losses CD files into a ‘very good’ quality lossy files. OK, but that’s still just talking. So in the next post I’ll test how good they actually are when compared.

Maciek

Kompresja, Limitacja, Rewerberacja. Czyli, jak przystąpić do obróbki nagrań wokalnych?

Przed świętami dostałem wiadomość od Sadiego z paroma pytaniami o podstawowych aspektach obróbki głosu. Wysłałem mu parę notatek, ale wydaje mi się, ze skoro mam taką możliwość to wrzucę tutaj troszkę informacji o obróbce wokalu. Postaram się zdemaskować parę naprawdę ważnych mitów związanych z kompresją, limitacją i rożnymi efektami, które zainteresowani na pewno już znają, ale chcieliby wiedzieć o nich trochę więcej.

Oczywiście z chęcią odpowiem na rożne pytania i podesłane mi obrobione nagranie z jakimiś konkretnymi złośliwostkami dotyczącymi postprodukcji.

Kompresja

Jednym z najważniejszych elementów w miksowaniu jest kompresja. Niezmiernie ważne żeby zrozumieć o co w niej chodzi. Strasznie łatwo rozpoznać czy dane nagranie przeszło czy nie przeszło przez poprawną kompresję. W świecie audio używamy kompresorów, aby wyrównać dynamikę ścieżek dźwiękowych (Czyli sprawić, że głośniejsze stanie się cichsze, a cichsze głośniejsze). W przypadku wokalu może się zdarzyć ze będziemy mieli bardzo gorący sygnał gdzie wokalista krzyczy do mikrofonu, a chwile później szepcze. Jeżeli z jakiegoś powodu nie będziemy chcieli nagrać tych dwóch miejsc oddzielnie to kompresor może nam pomóc wyrównać głośność tego sygnału. W tym wypadku pewnie będziemy chcieli stworzyć blokadę (threshold) w miejscu gdzie uważamy, że kompresja powinna się zaczynać. A co to threshold? Możemy kręcić każdym pokrętełkiem na kompresorze, ale jeżeli threshold jest wyższy niż sam wejściowy sygnał który ma przechodzić przez kompresje to nic się nie stanie. Można na to spojrzeć w ten sposób. Jeżeli mamy turbinę wodną wiszącą 3 metry nad poziomem wody to oczywiście nie będzie pracowała, prawda? Kiedy obniżymy turbinę to zacznie pracować. Z podobnym nastawieniem możemy podchodzić do ustawiania thresholdu.

Ponadto na kompresorach mamy parę innych możliwości edytowania sygnału. Zetkniemy się z opcjami: threshold*, ratio, attack, release i make up gain.

Co robi każdy z tych elementów oznacza łatwo można wytłumaczyć używając obrazka poniżej.


1

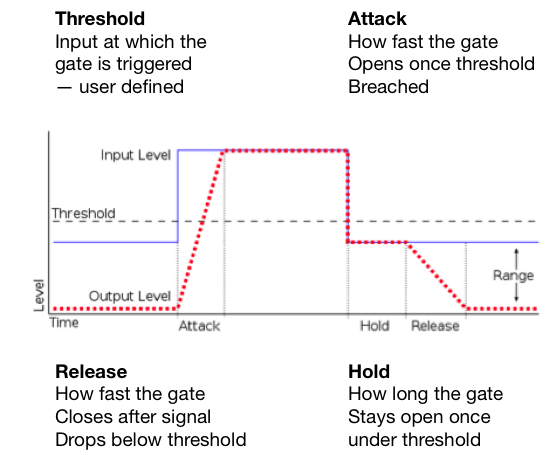
Fig 1 Co tak naprawdę dzieje się z wejściowym sygnałem podczas kompresji.

Threshold pozwala na kontrolę kiedy kompresor zaczyna działać. Prawdopodobnie najważniejszy element wymagający poprawnego ustawienia. Jeżeli threshold jest za łagodny (bliższy -0dB) to żadna kompresja nie będzie miała miejsca. (dB = decybel)

Attack to ilość czasu, który kompresor bierze zanim zacznie działać. Mówimy o małych jednostkach czyli 1ms – 2000ms.

Release to ilość czasu, który kompresor bierze zanim przestanie oddziaływać na sygnał. To może brzmieć jak dziwna opcja, ale release pozwala na wiele naprawdę fajnych brzmień kiedy zrozumie się o co w nim chodzi. Dla zainteresowanych* przez ustawianie bardzo krótkiego release time na perkusji możemy sprawić, że będzie brzmieć bardziej agresywnie i jaśniej bez dodawania żadnego EQ. Używając release time możemy dodawać zawartość harmoniczną do rożnych nagrań przez przesterowanie niskich częstotliwości.

Make-up-gain W rzeczywistości kompresor nie robi nic oprócz obcinania szczytowego sygnału (peak signal) przechodzącego przez threshold. Przez to wszystkie głośne dźwięki na ścieżce będą cichsze. Ustawienie thresholdu sprawia ze poziomy głośności będą bardziej zgodne. W takim razie po obcięciu głośnych dźwięków możemy użyć make-up-gain żeby podnieść sygnał z powrotem do naszego wymarzonego poziomu.

Trzeba oczywiście pamiętać, że kompresja działa również na hałas tła nagrania! Za każdy 1dB redukcji sygnału hałas tła w cichszych miejscach podniesie się o 1dB. Dodatkowo musimy pamiętać ze ciężka kompresja może również wyolbrzymiać spółgłoski szczelinowe: s, sz, cz, ś, ź…

2
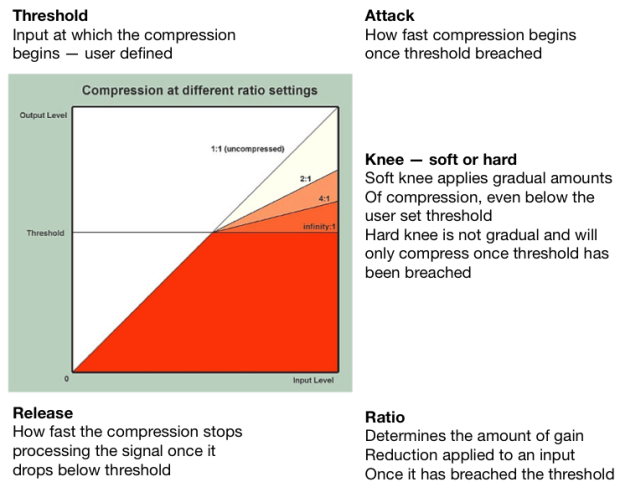
Fig 2 Tak będzie wyglądało okienko kompresora z graficznym wyświetlaczem. Ważne żeby zrozumieć co robi ratio.

Z podstawową wiedzą warto od razu przystąpić do testowania tego wszystkiego przez kręcenie pokrętełkami samemu. Tak można wprowadzić w życie trochę teorii i wyrobić sobie własne zdanie o brzmieniach produkowanych przez rożne kompresory.

Ratio kontroluje intensywność kompresji po przejściu przez threshold. Na przykład:

*Kompresja 2:1 oznacza, że za każde 2dB które przechodzą przez threshold, tylko 1dB tego sygnału tak naprawdę wyjdzie na zewnątrz. Dlatego ratio 4:1 oznacza, że będzie trzeba upchnąć 8dB przez threshold żeby wydobyć z niego sygnał 2dB. Ratio 8:1 oznacza, że będzie trzeba upchnąć 16dB przez threshold żeby wydobyć z niego sygnał 2dB. Więcej kompresji mniej wychodzącego sygnału, ale też kompresor bardziej koloruje sygnał. Każdy kompresor ma swoje własne brzmienie!

PRESETS

No dobra, ale jak to się ma do nagrań z którymi możemy się spotkać. Zanim ktoś zrozumie na czym polega ten cały koncept z kompresją pewnie będzie chciał mieć parę miejsc, od których będzie mógł zacząć. 

PRESETS’ (ustawienia) które teraz podam powinny być dobrym punktem startowym! Dobrze mieć swoje miejsca gdzie się zaczyna, ale każdy głos jest inny zatem potrzebuje innej edycji. Każdy musi mieć własne zdanie. To że ktoś używa jakieś ustawienia na swoich nagraniach nie znaczy, że te same ustawienia będą działały na twoich. W świecie audio po prostu tak jest. Nie ma jednego złotego środku na to wymarzone, wspaniałe brzmienie.

Wokal

Attack: 10 – 50ms

Release: 200 – 2000ms (Zazwyczaj ustawiam szybszy release czas, ale wszystko zależy od tego jaki efekt chcę uzyskać)

Ratio: 2:1 – 4:1 (łagodne)

Threshold: często będę ustawiał tak żeby było 12dB redukcji w najgłośniejszych miejscach piosenki

Make-up-gain: to wasz problem. Sami go rozkminiajcie.

No dobra przejdźmy teraz na chwile do limiterów. Czym jest limiter? Limiter jest kompresorem z wysokim ratio i zazwyczaj szybkim attack time. Dla mnie kompresor z ratio 10:1 lub więcej to limiter. Odważę się nawet powiedzieć, że limiter znajduje się na prawie każdym stereo busie piosenek w dzisiejszej branży muzycznej. Używanie limiterów związane jest z całkiem nieprzyjemnym brzmieniem przesterowanego sygnału w domenie cyfrowej, który kompletnie niszczy muzykę w cyfrowym formacie. Niektórzy zachwycają się przesterami na płytach winylowych, ale jakoś nie znam nikogo kto dla relaksu słucha przesterowanych sygnałów domeny cyfrowej ;]

3
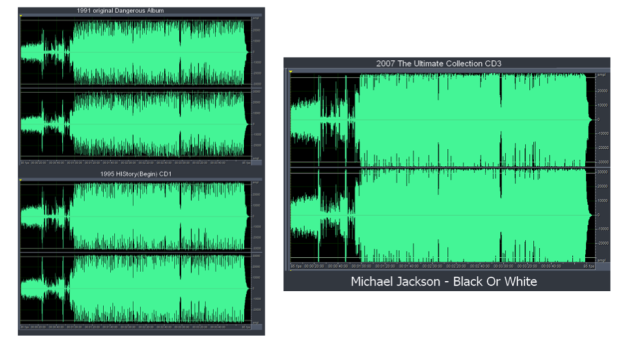
Fig 3 Miksy „Black Or White” MJ’a. Ciekawy przykład z widoczną kompresją i zmianą w dynamice piosenki po remiksach w 1995 i 2007. Jeżeli ciekawi was Wojna Głośności „The Loudness War” to tutaj jest krótki filmik, który jasno pokazuje jak jakość dźwięku cierpi po nadmiernym limitowaniu sygnału.

Limiter

4

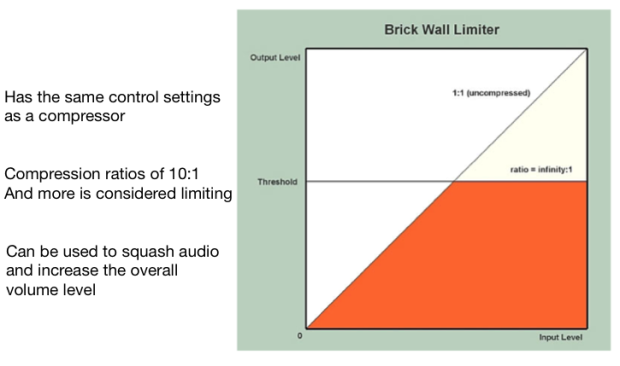
Fig 4. Limiter inaczej Brick Wall Limiter.

Teraz kiedy już wiemy co robią kompresor i limiter zabierzmy się za kolejny fundamentalny askpekt miksowania. Jeżeli kiedykolwiek miksowałeś/aś to wiesz jak trudno jest poskromić dynamikę wszystkich dostępnych nagrań i sprawić żeby w przyjemny sposób skleiły się w jakąś całość. Jest to trudne w szczególności jeżeli jeszcze nie zniszczyliśmy krzywej uczenia(learning curve) i nadal nie jesteśmy pewni jak działają narzędzia których używamy. Przejdźmy w takim razie do bardzo szybkiej zasady miksowania, która powinna przyświecać nam za każdym razem kiedy siadamy do pracy nad jakimś nagraniem.

Generalnie nie chcemy żeby jakikolwiek sygnał wychodził poza -6 decibel full scale (dBFS) na naszym mierniku głośności. W zależności od tego z jakim gatunkiem muzycznym pracujemy możemy chcieć popchnąć tę granice do -3dBFS. Dobrym przykładem gdzie pewnie będziemy chcieli wyciągnąć wszystko jak najgłośniej jest miksowanie dzisiejszej muzyki popularnej. Poza tym, podczas miksowania spotkamy się często z kawałkami sygnału, które będą się wybijały poza nasz zdrowy limit -3 lub -6dBFS. Takim przykładem może być werbel, który ma się przebijać przez miks. Tak długo jak będziemy mieli ustawiony limiter na naszym stereo busie na np. -0.1dBFs nie powinniśmy się o nic martwic. Zakładając, że jesteśmy usatysfakcjonowani  wszystkimi poziomami głośności to w procesie masteringu i tak mamy możliwość zmiażdżenia i wyrównania wybijających się sygnałów z resztą piosenki przy użyciu kolejnego limitera.

Ta ‘przestrzeń’ pomiędzy -6 a 0dBFS nazywana jest headroomem. Headroom pozwala nam na stworzenie finałowego masteru gdzie mamy pełną kontrole nad głośnością, którą z łatwością możemy podgłośnić przy pomocy kompresji i limitacji. W domenie cyfrowej nie da się podgłosnić miksu, który już jest przesterowany. Nie da się tego bardziej podkreślić. Powtórzę.

W domenie cyfrowej nie da się podgłośnić czegoś co już jest na granicy przesteru.

Potrzebujemy naszego miejsca, przestrzeni innymi słowy… Potrzebujemy headroomu.

Kiedy już przygotujemy nasz pierwszy miks z odpowiednia ilością headroomu wystarczy, że otworzymy sobie nowy projekt w naszym DAWie (Digital Working Station) i zaczniemy obróbkę naszego wyeksportowanego miksu. Eksportowany plik, który będziemy używać od produkcji finałowego masteru powinien być najlepszej jakosci. Najlepiej urzywać rozszerzeń .wav albo .aiff, są to bowiem pliki bezstratnej kompresji.

Podczas pracy nad finałowym masterem poprawiamy nasz miks na rozmaite sposoby. Tutaj napisze tylko o kompresji która jest ostatnim elementem który wpływa na nasz sygnał przed wyjściem głównym (main output).

Z naszym wychodzącym sygnałem będziemy chcieli zrobić dwie podstawowe rzeczy. Pierwsza to nałożenie lekkiej kompresji na naszym torze, która tylko pocałuje wybijające się części sygnału. W tym momencie chcemy bardzo subtelnie skleić cały sygnał z może 1dB lub 2dB redukcji. W ostatniej kolejności wrzucamy limiter, po czym ustawiamy threshold (tak jak chcemy) i ‘out ceiling’ (to ustawiamy na -0.1dBFS). Nasz ‘out ceiling’ zapobiega przedostawania się sygnałów w rejon przesterowania. Po ustawieniu thresholdu najlepiej sprawdzić najgłośniejsze miejsca naszego sygnału słuchając czy przypadkiem niczego nie przesterujemy.

Jeżeli już jesteśmy usatysfakcjonowani z naszym miksem klikamy eksport i maszerujemy posłuchać go na jakimś innym systemie niż ten którego używaliśmy do miksowania… Po kilku minutach siadamy i zaczynamy poprawiać błędy z których obecności nie zdawaliśmy sobie sprawy podczas miksowania na naszych głośnikach lub słuchawkach. Witamy w świecie realizatorów dźwięku…

Reverb

W obróbce głosu jednym z najważniejszych efektów jest kompresja. Naprawdę ważne żeby zrozumieć co robi z sygnałem. Kolejnym efektem jest reverb czyli pogłos (rewerberacja) – zjawisko stopniowego zanikania energii dźwięku po ucichnięciu źródła, związane z występowaniem dużej liczby fal odbitych od powierzchni pomieszczenia. Jest mnóstwo efektów gdzie to zjawisko jest sprytnie odwzorowane za pomocą całkiem skomplikowanych algorytmów. Reverb jest szczególnie ważny jeżeli wokalista/ka jest niepewny swojego głosu, albo po prostu kiepsko śpiewa. Odrobina pogłosu może dać naprawdę dużo, ale nie zdziała cudów. Kiepskie nagranie pozostanie nim niezależnie od tego ile pogłosu czy EQ do niego dołożymy. Ważne żeby o tym pamiętać.

Z efektami najlepiej pobawić się samemu i odkrywać własne brzmienia. Jakkolwiek cała zabawa zaczyna się w momencie kiedy próbujemy odwzorować jakiś efekt. Jak stworzyć reverb Elvisa na naszych nagraniach? Możemy użyć jakiś mały plate reverb albo emulator tape delay z mniej więcej 100-120ms predalay, 0 feedback, odrobiną EQ i będziemy mieli jakiś odpowiednik pogłosu z lat 50tych. Nie takie trudne. Gorzej kiedy nie mamy takiej informacji i nawet nie wiemy gdzie zacząć. W takich momentach musimy polegać na naszych uszach, ale również na naszej kreatywności. Zawsze możemy coś skopiować, ale dopiero to jak to odtworzymy zadecyduje o naszych umiejętnościach. Możemy odwrócić albo reampować cały proces, dodać jakiś dziwny efekt sprawić żeby brzmiało tak jak efekt stworzony przez Ciebie a nie kogoś innego.

To co próbuję powiedzieć to to ze każdy kto się interesuje tego typu procesem postprodukcji powinien sam poeksperymentować z możliwościami efektów które posiada bo w ten sposób najlepiej się ich nauczy.

No tak, ale łatwo coś takiego powiedzieć. Warto oczywiście wiedzieć co one tak naprawdę robią. Zazwyczaj ważniejsze jest to jak coś brzmi niż jak coś działa. W końcu większość ludzi będzie słuchało muzyki a nie czytało przez jaką postprodukcje przeszła poszczególna piosenka. Realizator dźwięku, producent, muzyk oni mogą być ciekawi, ale nie przeciętny słuchacz.

Co do efektów, które mogę polecić do obróbki głosu i nie tylko to warto zerknąć na: Izotope Alloy 2TrueVerb Waves, L2 Ultramaximizer Waves

Maciek (Razjel)